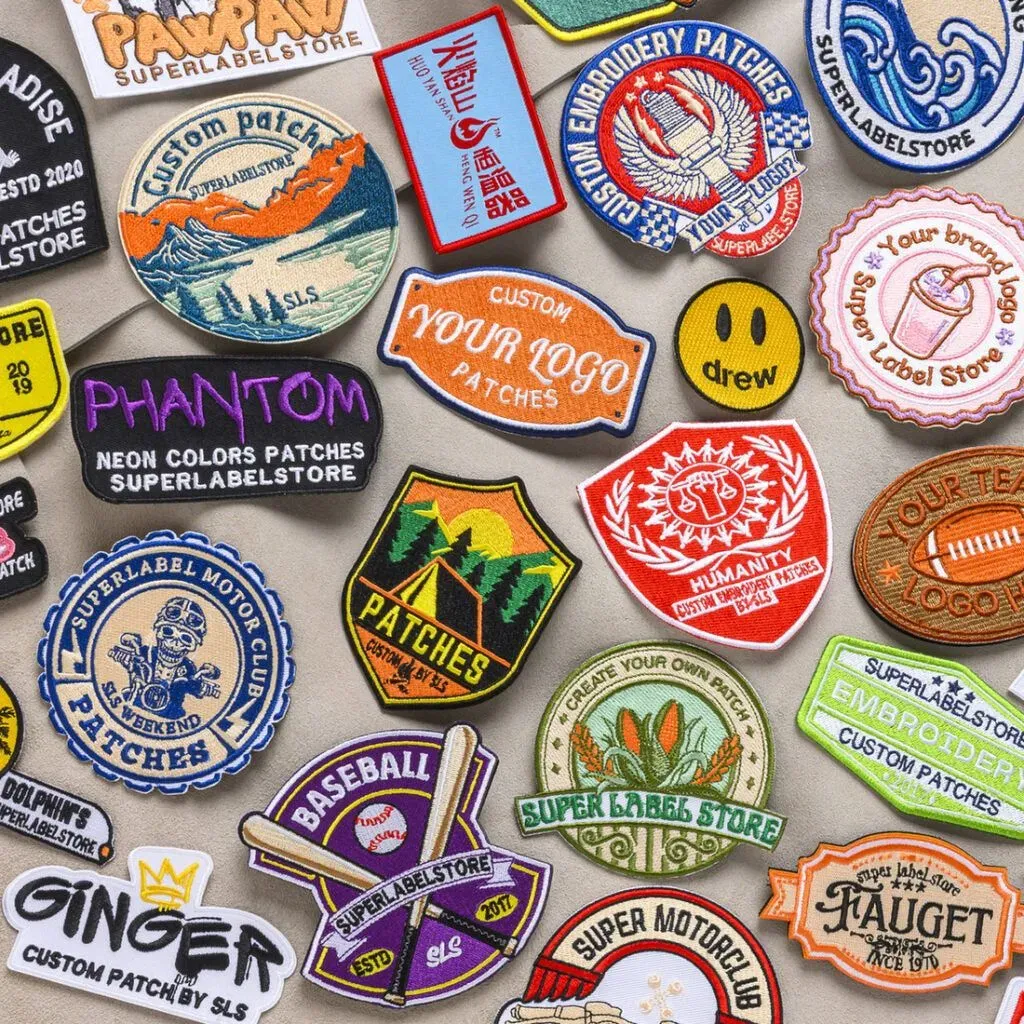
In today’s market, custom patches design is more than decoration—it’s a powerful branding tool that can tell a story, reinforce a team or company identity, elevate apparel, merchandise, and events, and create lasting impressions across audiences. From thoughtfully choosing shapes and sizes to selecting backing, understanding how to make patches stand out relies on clear goals, consistent branding, and smart design decisions that perform under real-world wear. This guide distills patch embroidery design tips into practical steps, helping you balance color, texture, legibility, scale, and longevity across fabrics, stitching methods, and care instructions. Explore a range of ideas with custom patch ideas and patch design tricks, from bold outlines to high-contrast palettes that pop on uniforms, jackets, bags, or caps, while considering production constraints. By focusing on purpose, audience, and test patches, you can craft wearable patches that grab attention, align with brand narratives, and endure the test of wear, wash, and repeated applications.
To frame this topic from another angle, think about badge creation for apparel, embroidered insignias, and brand patches as a form of wearable storytelling that combines craft with strategy. Alternative terms such as emblems, crest designs, and fashion patches help buyers imagine different applications—from team gear to merchandise lines. LSI principles suggest linking concepts like texture, color theory, backing options, and production workflows to the core idea of patch making, so related searches and readers discover interconnected topics. By expanding vocabulary to include garment adornments, surface embroidery, and accessory branding, you reinforce relevance without repeating the same keyword and boost semantic depth.
1. The Foundation of Custom Patches Design: Purpose and Audience
In the early stage of custom patches design, the priority is clarity: define the patch’s purpose, identify who will wear it, and decide where it will appear on fabric. This alignment informs every design decision, from shape and size to thread choices and backing options. By grounding the project in the intended use and audience, you set up a workflow that reduces revisions later and increases the likelihood of a patch that resonates with wearers and brand goals.
If you’re wondering how to make patches stand out, start with a compelling focal point—an emblem, mascot, or initials—and ensure it reads from a distance. This stage also invites practical questions like whether the patch is a badge or a logo, what backing is needed, and what the target price point is. Emphasizing these elements in the early plan helps guide the broader strategy for custom patches design and ultimately supports a stronger, more memorable outcome.
2. Shape, Size, and Border: Design Levers for Impact
Patch shape is a major lever in custom patches design. A circular shape can convey tradition, while a shield or hexagon projects energy and modernity. Irregular or custom contours can be striking, but they demand careful edge finishing to maintain durability and legibility. The size should match the patch’s viewing distance and garment context, with larger patches offering more detail and smaller patches favoring bold focal points.
Edge finishing matters as much as the silhouette. A merrowed border provides durability and a classic, finished look, while a laser-cut edge offers a contemporary, minimal aesthetic. When thinking about how to make patches stand out, test combinations of bold shape + crisp edge treatments to achieve a silhouette that remains legible and distinctive across fabrics and production batches.
3. Color Theory and Thread Selection: Crafting Contrast that Pops
Color is a language in patch design, influencing contrast, legibility, and mood. Start with a restrained palette that supports the logo or emblem, then introduce an accent color to guide attention to the focal point. The choice of thread matters as much as color; polyester threads provide bright, durable finishes with strong wash resistance, while metallics can add a luxe touch when used sparingly.
For legibility on varied fabrics, test colors on material swatches because hues that look perfect on screen can disappear on heather or dark backgrounds. High-contrast pairings—light logos on dark backgrounds or bold outlines around multicolor interiors—often help essential shapes pop. Remember to consider embroidery limitations, as some gradients may not reproduce cleanly and may require simplification for reliable results.
4. Typography and Imagery Integration: Balancing Text and Iconography
Typography is a critical element when patches carry text like club names or event dates. Ensure legibility at small sizes, avoid overly ornate fonts, and consider outlining letters to boost readability on busy patches. When viewed from a distance, the type should be instantly recognizable and supportive of the emblem rather than competing with it.
Balancing imagery with typography requires careful composition. The emblem should anchor the design while the text reinforces the brand or message, so place initials or a small icon where they won’t overwhelm the wordmark. This approach preserves clarity across patch sizes and maintains a strong, cohesive look that aligns with custom patch ideas and practical patch design tricks.
5. Embroidery Techniques and Texture: Building Depth and Durability
The embroidery technique chosen can dramatically affect appearance and wear. Patch embroidery design tips emphasize layering and appropriate stitch density based on size. Key methods include satin stitch for bold outlines, fill stitches for large color areas, and contour stitches to define edges, with insulated or chenille stitches providing texture and tactile interest without sacrificing readability.
Texture and color interaction are crucial for a premium patch. A well-balanced patch uses a mix of finishes—matte interior fills with a glossy border—to catch light and eye contact. When ordering in bulk, ensure thread finishes stay consistent across batches to avoid color shifts that can undermine the patch’s perceived quality and brand alignment; these considerations align with best practices in patch design tricks and embroidery technique selection.
6. Backing, Application, and Production: Practical Considerations for Longevity
Backings and application methods are often the quiet workhorses of a patch’s performance. Iron-on backings offer convenience yet can compromise durability if heat settings are misused, while sew-on patches deliver maximum longevity and a premium feel. Velcro backings provide removable options for versatile apparel lines. When you design with backing in mind, you create patches that survive repeated wearing, washing, and handling.
Production considerations should blend aesthetics with efficiency. Limit thread colors to reduce setup costs, choose patch sizes and border styles that scale well, and align fabric and backing with garment care. A clear, print-ready spec sheet with color codes and stitch counts helps operators reproduce consistently. By integrating these practical steps, you can achieve patches that stand out in real-world wear and align with smart patch ideas for scalable production.
Frequently Asked Questions
What is custom patches design and how can you make patches stand out?
Custom patches design is the planning process for creating patches that convey a clear message or brand, from shape and size to thread choices and backing. To make patches stand out, start with a clear focal point (emblem, mascot, or initials) and choose a striking shape and high-contrast colors. Use strong edge finishing like merrow borders and appropriate embroidery techniques to ensure durability, and select a backing (iron-on, sew-on, or Velcro) that fits the garment. Always test on the target fabric to confirm legibility and wearability.
What are patch embroidery design tips to create standout patches?
Patch embroidery design tips include limiting the color palette to keep production simple, using satin stitch for bold outlines, fill stitches for large color areas, and contour stitches to define edges. Test color contrast on both light and dark fabrics, and avoid overly fine details that won’t read at small sizes. Consider textures and subtle metallic threads sparingly to avoid overpowering the main motif.
Can you share custom patch ideas for different industries and applications?
Yes: sports teams benefit from bold shields and mascots; clubs favor circular crests with modern typography; fashion collaborations can explore abstract shapes, gradient fills, and metallic threads for a luxe edge; corporate patches should emphasize clean geometry and a strong brand color palette; pediatric or youth organizations respond to playful icons and bright colors to create a sense of belonging.
What patch design tricks improve readability and impact on small patches?
Patch design tricks for readability on small patches include using bold, legible typefaces with outlines for extra readability, maximizing foreground-background contrast, simplifying complex artwork, placing key elements in prominent positions, limiting fine detail, and using negative space to separate elements so the design remains readable at a glance.
How should you define the purpose and audience in custom patches design to ensure the patch stands out?
Define purpose and audience early: determine who will wear it, how the patch will be used, and the garment context. This guides shape, size, border, and backing choices and helps ensure the patch reads from a distance. Clear goals inform color, typography, and layout decisions, while aligning these with the production plan (colors, stitches, backing) enhances impact and perceived value.
What patch design tricks balance detail and durability in custom patches design?
Patch design tricks to balance detail and durability include limiting thread colors and stitch counts for cost efficiency, using merrow borders for durability, selecting embroidery that scales well to the intended size, and testing patches on actual fabrics. Provide production-ready specs (color codes, dimensions, stitch counts) to ensure consistency across batches and maintain a high-quality finish.
| Section | Key Points | Notes / Examples |
|---|---|---|
| 1. Define purpose and audience | Start with purpose: determine use, wearer, and fabric location. Decide if the patch is a badge or logo; choose iron-on, sew-on, or Velcro-backed; set target price and color limits. Build a strong focal point (emblem, mascot, initials) to guide the eye. | Ground decisions in practical constraints: size, thread count, and backing type. Align with audience and function to avoid overcrowding or color clashes. |
| 2. Shape, size, and border influence | Shape drives impression (circular, shield, hexagon, or irregular). Edges matter: merrowed borders vs laser-cut edges. Size should suit use; bigger allows detail, smaller needs simpler focal points. | Aim for striking shape, clear silhouette, and durable edge finishing. Readability at typical viewing distances is key. |
| 3. Color theory and thread selection | Use a limited palette with an accent color. Choose thread types (polyester for durability; metallics sparingly). Test colors on fabric swatches; ensure legibility on different fabrics. | High-contrast pairings help essential shapes pop; account for embroidery limitations and potential color shifts across batches. |
| 4. Typography and imagery integration | Ensure legible type; avoid overly ornate fonts. Outline letters if needed. Balance text and emblem so one anchors the design while the other complements. | Place initials or icons near the top with a concise wordmark below to preserve clarity across sizes. |
| 5. Embroidery techniques that elevate patches | Choose techniques like satin stitch for outlines, fill stitches for color areas, and contour stitches for edges. For depth, consider insulated or chenille stitches. | Texture balance and thread consistency across batches are important for a polished look. |
| 6. Backing and application options | Backings affect durability and user experience: iron-on is convenient but less durable; sew-on offers maximum durability; Velcro backings enable removability. | Align backing choice with garment care instructions and intended life span; consider edge finishing for outdoor or high-wear use. |
| 7. Production considerations and cost management | Limit thread colors to reduce setup costs; size and border choices should be cost-effective. Prepare a print-ready file with color codes and stitch counts. | A clear spec sheet prevents surprises and helps meet creative and budget goals. |
| 8. Common mistakes and how to avoid them | Avoid overcrowding, low contrast, and too many colors. Ensure legibility at small sizes; test patches; obtain production approvals before full runs. | Simplify designs, test thoroughly, and maintain open approvals with the production team. |
| 9. Creative ideas for industry patches | Sports: bold shields/mascots; clubs: circular crests with modern typography; fashion: abstract shapes, gradients, metallics; corporate: clean geometry; youth: bright icons. | Align patch concepts with brand stories or event themes to boost impact and memorability. |
| 10. Presenting patches to clients or teams | Provide mockups on realistic fabrics, offer multiple sizes and color variants, compare with existing patches, and discuss cost drivers (colors, backing, size). | A strong proposal builds stakeholder confidence and speeds decisions. |