This guide helps you attach and care for custom patches with clarity and confidence, offering practical steps that work for beginners and seasoned crafters alike. Whether you’re decorating jackets, backpacks, or jeans, you’ll discover reliable methods, essential tools, and safe, durable workflows that make patch projects efficient and enjoyable, even when fabrics vary, textures shift, or finishes demand extra care, and this flexibility helps when working with woven, knit, or synthetic blends. If you’re curious about how to attach patches to clothing, this guide outlines practical methods and focuses on a clean edge and secure bond, while briefly noting sewing patches on fabric where appropriate, and offering tips on alignment, thread choice, and stitch spacing that support long-term stability. In addition, the guide covers care for embroidered patches to help preserve color, texture, and adhesion through regular washing, gentle cycles, and careful storage, plus guidance on avoiding direct heat, sunlight, and aggressive scrubbing that can wear away embroidery. It also emphasizes the best methods to apply patches across different fabrics, ensuring you select the most suitable technique for each garment or accessory while avoiding common pitfalls and leaving room for adjustments when seams or hems require extra slack.
From a broader perspective, the topic covers patch application across fabrics through heat, stitching, or adhesive approaches, with attention to material compatibility such as denim or knit. Using synonyms like garment embellishment, fabric applique, and decorative repairs helps search engines connect related concepts without redundancy. Care and maintenance topics—how to preserve adhesion, color retention, and edge integrity—round out the practical guidance. This approach aligns with LSI principles by linking techniques, tools, and aftercare to a cohesive craft narrative that serves readers and search engines alike.
Attach and care for custom patches: Methods, care, and longevity
Custom patches add personality to jackets, backpacks, jeans, and more. To maximize their life, start by choosing a method that suits your fabric and the patch’s backing, then plan a simple maintenance routine that preserves color and detail over years. This guide helps you understand the trade-offs between iron-on, sew-on, and adhesive-backed options, so you can attach and care for custom patches with confidence.
When you set out to attach patches, the right prep matters as much as the method you pick. Clear backing, fabric-safe pressing surfaces, and a clean workspace help ensure a strong bond and a neat edge. With the right approach, you’ll reduce fraying, heat damage, and edge lifting, keeping patches vibrant through many wash cycles.
How to attach patches to clothing across fabric types
If you’re wondering how to attach patches to clothing, start by assessing the fabric type. Denim and cotton respond well to heat-activated methods, while knits and synthetic blends often need gentler handling or sew-on stitching to prevent distortion.
Positioning is a key step across fabrics. Use pins or fabric chalk to mark the planned location, then choose the method that will hold up under wear and washing. For knits or stretch fabrics, sewing patches on fabric may provide more durable results than heat alone, especially in high-movement areas.
Sew-on patches: durable stitching techniques for different fabrics
Sew-on patches offer long-lasting performance and are versatile across many fabrics. A simple running stitch around the edge is common, but satin or blanket stitches create a neater, more durable finish and can handle higher-wear zones.
When sewing, match thread color to the patch or garment edge and secure with a small underside knot. For added durability, consider stitching around the border twice and reinforcing corners. This approach aligns with care for embroidered patches, helping them withstand frequent washing.
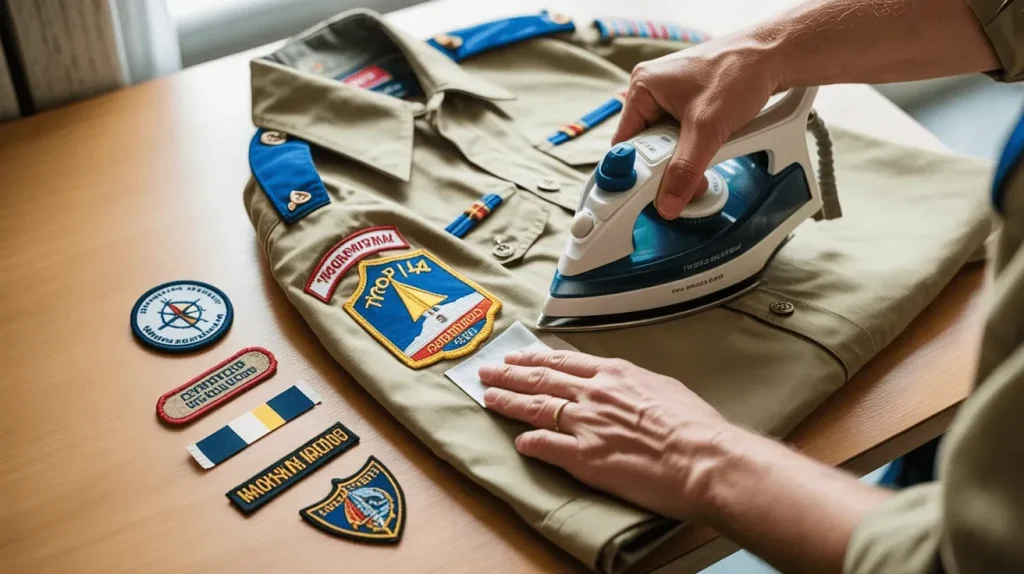
Iron-on and adhesive-backed patches: heat, timing, and security considerations
Iron-on patches provide a quick, clean look on cotton and denim, but they require careful heat control to avoid scorching delicate fabrics. Use a thin cloth as a buffer and press with steady, medium-high heat for 20–40 seconds, then check for a secure bond.
Adhesive-backed patches can be convenient, yet they benefit from a light stitch or two along the edge for extra security in high-wear areas. Always follow the patch manufacturer’s heat guidelines, and be mindful of fabric compatibility to prevent warping or edge peeling.
Patch maintenance tips: prolonging color, bond strength, and appearance
Proper patch maintenance starts with careful washing. Turn garments inside out, choose a gentle cycle, and use mild detergents to protect adhesives and embroidery. Air drying is ideal, but a low-heat dryer setting can work if you monitor the load closely.
Edge upkeep is key to a clean look. If edges lift, resew a small border or add a top stitch along the border. Regular inspections after washes help catch loose threads early and extend the life of both patch and garment.
Troubleshooting common issues when attaching patches
If a patch won’t stick, review fabric type and patch backing. Re seat with fresh heat and pressure, or switch to sew-on for that area. The issue often comes down to fabric weave or improper pressing technique.
Common problems like edges lifting after washing or patches wrinkling can be resolved with targeted fixes: resew along the edge, tighten tension when attaching to knit fabrics, or lower heat on delicate materials. With the right adjustments, you’ll restore a flat, durable bond and keep your patches looking new.
Frequently Asked Questions
How to attach patches to clothing: what are the best methods to apply patches?
Choose the right method for your fabric. For iron-on patches, position the patch, cover with a thin cloth, and press with a hot, dry iron for 20–30 seconds, then let it cool (repeat from the backside if possible). Sew-on patches require pinning in place and stitching around the edge with small, tight stitches for durability. Adhesive-backed patches can be heat-activated and bonded, but adding a few border stitches improves longevity, especially in high-wear areas.
Care for embroidered patches: how can I extend their life after attachment?
Follow patch care basics to preserve embroidery: turn garments inside out and wash on a gentle cycle with cool or warm water and a mild detergent. Air dry when possible; if using a dryer, select a low-heat setting and remove promptly. If edges loosen, re-sew a small border or apply a satin stitch to secure the edge and maintain a neat appearance.
Sewing patches on fabric: what technique ensures durability across fabrics?
For sewing patches on fabric, align the patch and pin it in place. Choose a stitch style (simple running stitch, satin stitch, or blanket stitch) and sew around the edge with small, tight stitches. For extra durability, go around twice and use a thread color that matches the patch or garment. Trim any loose threads after finishing.
Best methods to apply patches on different fabrics
Match the method to the fabric: denim and cotton work well with iron-on patches, while knits often benefit from sew-on patches to avoid heat distortion. Adhesive-backed patches can work on sturdy fabrics like canvas or denim but usually need a few extra stitches for security. Always pre-wash the fabric, test a small area, and follow the patch manufacturer’s heat guidelines.
Patch maintenance tips: what are the key steps to keep patches looking good through washes?
Maintain patches by washing inside out on a gentle cycle with cool or warm water and mild detergent. Air dry when possible; if using a dryer, use low heat and remove promptly. If edges lift, resew a few discreet stitches around the border and inspect patches after several washes for any wear or distortion.
Attach and care for custom patches: how should I apply and care for patches on jackets and backpacks?
Decide on your method (iron-on, sew-on, or adhesive-backed) and gather the needed tools. For iron-on, apply heat as directed with a cloth barrier; for sew-on, stitch around the edge with matching thread; for adhesive-backed, bond with heat and add a few stitches for security. After attachment, care by washing inside out on a gentle cycle, air drying, and re-sewing any loose edges as needed to maintain longevity.
| Topic | Key Points |
|---|---|
| What you’ll need |
|
| Patch types and when to use them |
|
| Iron-on patches (step-by-step) |
|
| Sew-on patches (step-by-step) |
|
| Adhesive-backed patches (step-by-step) |
|
| Care and maintenance for patches |
|
| Patch care across different fabrics |
|
| Long-term care tips |
|
| Troubleshooting common issues |
|
Summary
Attach and care for custom patches with confidence as you learn reliable, fabric-aware methods and simple maintenance to keep patches vibrant and securely attached through years of wear. This guide covers the essentials—from choosing the right patch type for denim, cotton, knits, and blends, to step-by-step instructions for iron-on, sew-on, and adhesive-backed options. With proper prep, careful attachment, and mindful care, your patches will retain color and adhesion, looking fresh on jackets, backpacks, jeans, and more for a long time.