DIY Embroidered Design invites you to turn simple fabric into a personal work of art, even if you’re new to needlework. This beginner-friendly guide covers everything from choosing materials to finishing touches, with a gentle path through embroidery for beginners. You’ll practice core techniques and hand embroidery stitches that form the backbone of any project. It features a simple beginner embroidery project designed for quick wins and steady progress. From fabric prep for embroidery to a stitch tutorial for embroidery, this roadmap helps you avoid common mistakes and finish with confidence.
Viewed through a broader lens, this DIY embroidery project is a hands-on introduction to needlework that starts with simple motifs and careful fabric preparation. Think of it as a beginner-friendly stitching journey where basic stitches become tools for texture, color, and personal expression. As skills grow, you can translate the same approach to bags, garments, or home decor, exploring varied textures and patterns. The emphasis is on patient practice, consistent tension, and mindful design transfer—concepts that carry into more advanced embroidery endeavors. By starting with accessible motifs and clear steps, you’re laying the groundwork for a lasting hobby in decorative stitching.
DIY Embroidered Design: A Beginner’s Roadmap to a Simple, Satisfying Project
Starting with a DIY Embroidered Design makes the learning curve feel approachable. This section helps you choose a simple motif, set up a comfortable workspace, and keep stitch tension even so your embroidery lays flat and neat from the start.
As a beginner embroidery project, keep motifs small, select a limited color palette, and work on a suitable fabric. The goal is steady progress and consistent results, not perfection on your first try.
Embroidery for Beginners: Key Hand Embroidery Stitches You Should Learn Early
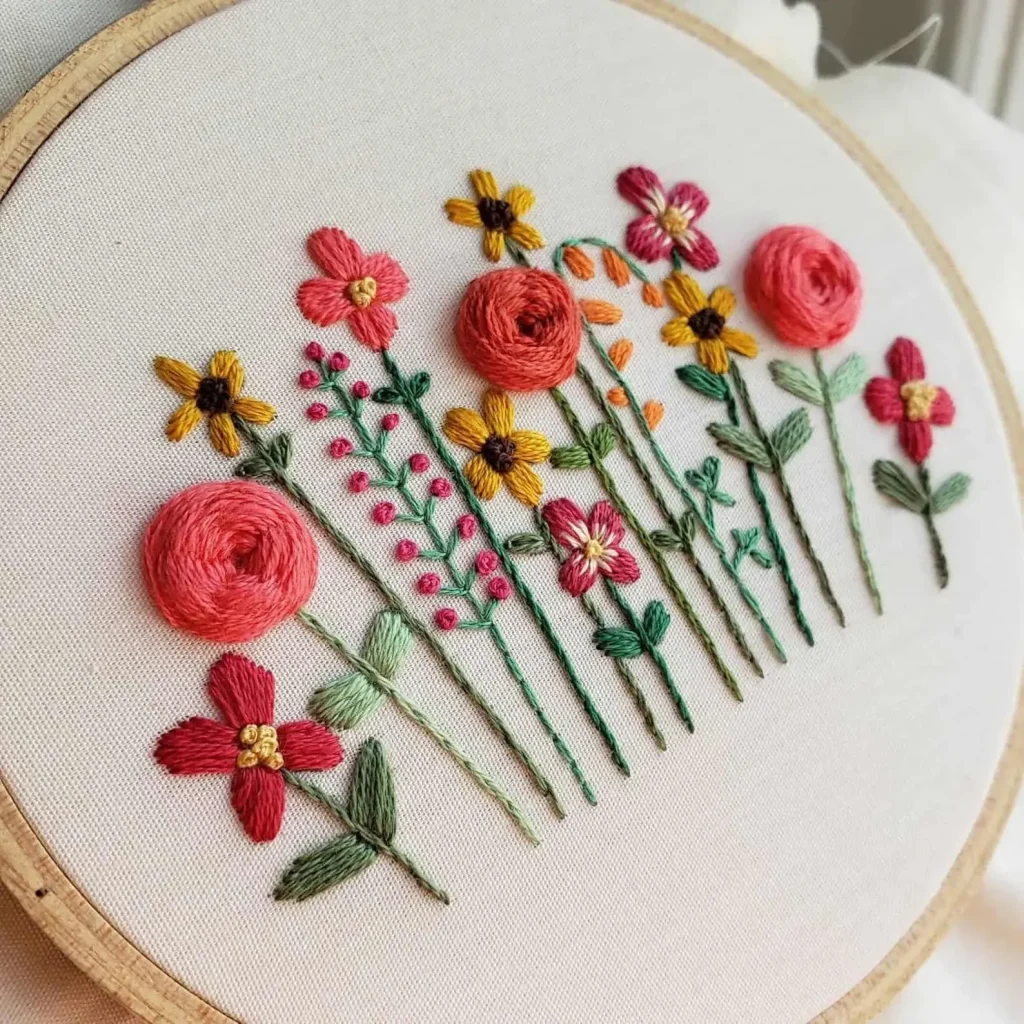
Mastering foundational hand embroidery stitches—backstitch, running stitch, and satin stitch—empowers you to outline, fill, and texture your designs with confidence. These stitches form the backbone of most beginner-friendly projects and translate well to a variety of motifs.
Focus on control and even tension as you practice. By building a solid foundation in these hand embroidery stitches, you’ll reduce frustrations and prepare yourself for more complex embroidery tasks ahead.
A Beginner Embroidery Project Blueprint: Tools, Fabric Prep for Embroidery, and Transfer Techniques
This blueprint covers the must-have tools for beginners: a suitable embroidery hoop, basic needles, and a curated set of floss colors. Selecting the right fabrics—light to mid-weight cotton, linen, or evenweave—sets the stage for clean stitches and better results.
Design transfer and fabric prep are central to a smooth start. Use water-soluble markers or tracing methods to outline your motif, then secure the fabric in a taut hoop. Proper fabric prep for embroidery helps you avoid puckering and ensures your stitches stay neat as you work.
Stitch Tutorial for Embroidery: Techniques to Build Confidence and Texture
This section walks you through a practical stitch tutorial for embroidery, focusing on applying backstitch for crisp outlines, satin stitch for solid fills, and running stitch for expressive detail. Each stitch builds confidence and texture in your project.
As you practice, keep your movements steady and stitch lines parallel. A thoughtful approach to stitch direction and spacing reduces gaps and creates a polished look, even on simple beginner motifs.
Common Mistakes to Avoid and Quick Fixes for Your DIY Embroidered Design
Even with careful effort, beginners may encounter issues like uneven tension, puckering, or loose threads. Recognizing these embroidery for beginners challenges early helps you adjust your grip, rethread, and reposition the hoop before bigger problems arise.
Smart fixes include working in small sections, testing on swatches, and trimming threads cleanly to prevent fraying. By addressing back side tidy-ness and consistent stitch length, you’ll elevate your DIY Embroidered Design with durable, professional-looking results.
Growing Your Skills: Projects and Tips to Elevate Your Embroidery Craft
Once you’re comfortable with a single motif, expand into a small bouquet or pattern across a tote, pillow, or clothing patch. This progression from a beginner embroidery project helps you apply learned stitches in broader, more creative ways.
Plan colors thoughtfully, experiment with texture, and keep a simple practice log. Regular practice, experiment with different fabrics, and gradually introducing new techniques will grow your confidence and skill over time.
Frequently Asked Questions
What is a DIY Embroidered Design and why is it ideal for embroidery for beginners?
A DIY Embroidered Design is a simple, beginner-friendly embroidery project that teaches the basics of design transfer, fabric handling, and basic stitches. It’s ideal for embroidery for beginners because it uses small motifs, manageable stitches, and practical finishing techniques to build confidence.
Which hand embroidery stitches should I learn first for a DIY Embroidered Design?
Start with backstitch for outlines, running stitch for simple lines, and satin stitch for filling shapes. These hand embroidery stitches cover most beginner needs on a DIY Embroidered Design and translate to many projects.
What is a good beginner embroidery project to try as part of a DIY Embroidered Design?
A simple flower with leaves is a perfect beginner embroidery project within a DIY Embroidered Design. It lets you practice transferring the pattern, outlining with backstitch, and filling with satin stitches while keeping the motif manageable.
How do I transfer a design and start stitching for a DIY Embroidered Design?
Transfer your design using a light source or a water-soluble pen, then secure the fabric in an embroidery hoop and begin stitching. If you’re looking for help, a stitch tutorial for embroidery can guide you through basic steps and troubleshooting.
How should I prep fabric for a DIY Embroidered Design, including fabric prep for embroidery?
Prepare a clean, wrinkle-free fabric, iron, and place it in an appropriately sized embroidery hoop. Use light-to-medium fabrics like cotton or linen, and cut floss into shorter lengths to avoid tangling. This is essential fabric prep for embroidery.
What common mistakes should I avoid when working on a DIY Embroidered Design, and how can I fix them?
Avoid uneven tension, puckering, gaps in satin fill, and frayed edges. Fix by rethreading, adjusting hoop tension, stitching in the same direction, and trimming tails neatly. A tidy back side improves durability and appearance.
| Section | Key Points | Notes / Examples |
|---|---|---|
| Purpose | Introduce a beginner-friendly DIY Embroidered Design and build confidence in basic stitches and fabric handling. | From selecting materials to finishing touches; emphasizes gradual skill development. |
| Target Audience | Absolute beginners; designed to grow with you. | Simple project path for steady progression. |
| Materials & Tools | Embroidery hoop (4–6 inches), needles (size 7–9), embroidery floss, light-to-medium weight fabric, scissors, transfer tools, simple design. | Test swatches recommended; balance between basic tools and beginner-friendly options. |
| Design, Transfer & Prep | Choose a simple motif; transfer outline onto fabric; prep fabric taut in hoop; thread with 1–2 strands. | Use water-soluble pens or transfer sheets for accuracy; ensure fabric is wrinkle-free before stitching. |
| Basic Stitches | Backstitch, Running stitch, Satin stitch; commonly add French knot and stem stitch as extras. | These stitches cover outlines to fills; start with a couple you enjoy and expand over time. |
| Step-by-Step Project | Mini Design: single flower with leaves; apply materials and stitches learned; finish with a polished piece through steady practice. | Follow order: outline, fill petals, add center/leaves, then details and finishing touches. |
| Common Mistakes & Fixes | Uneven tension, frayed edges, gaps in satin stitch, thread fraying, messy back side. | Re-thread, adjust hoop tension, trim threads, and keep backs tidy for durability. |
| Tips to Elevate | Practice on swatches; keep stitches evenly spaced; plan color palettes; finish and care for longevity. | Limited palettes (2–4 colors) help beginners; wash and press appropriately after finishing. |
| Variations & Project Ideas | Expand from a single flower to a bouquet; try different fabrics; add texture with mixed stitches; explore metallic or variegated threads; practice typography. | Growth paths include combining motifs and exploring new surfaces like tote bags, pillows, or patches. |
| Practical Project Checklist | Start small (2–3 inch motif); maintain a clean workspace; track stitches, colors, and challenges; seek inspiration; celebrate progress. | Helps build consistency and motivation for future projects. |