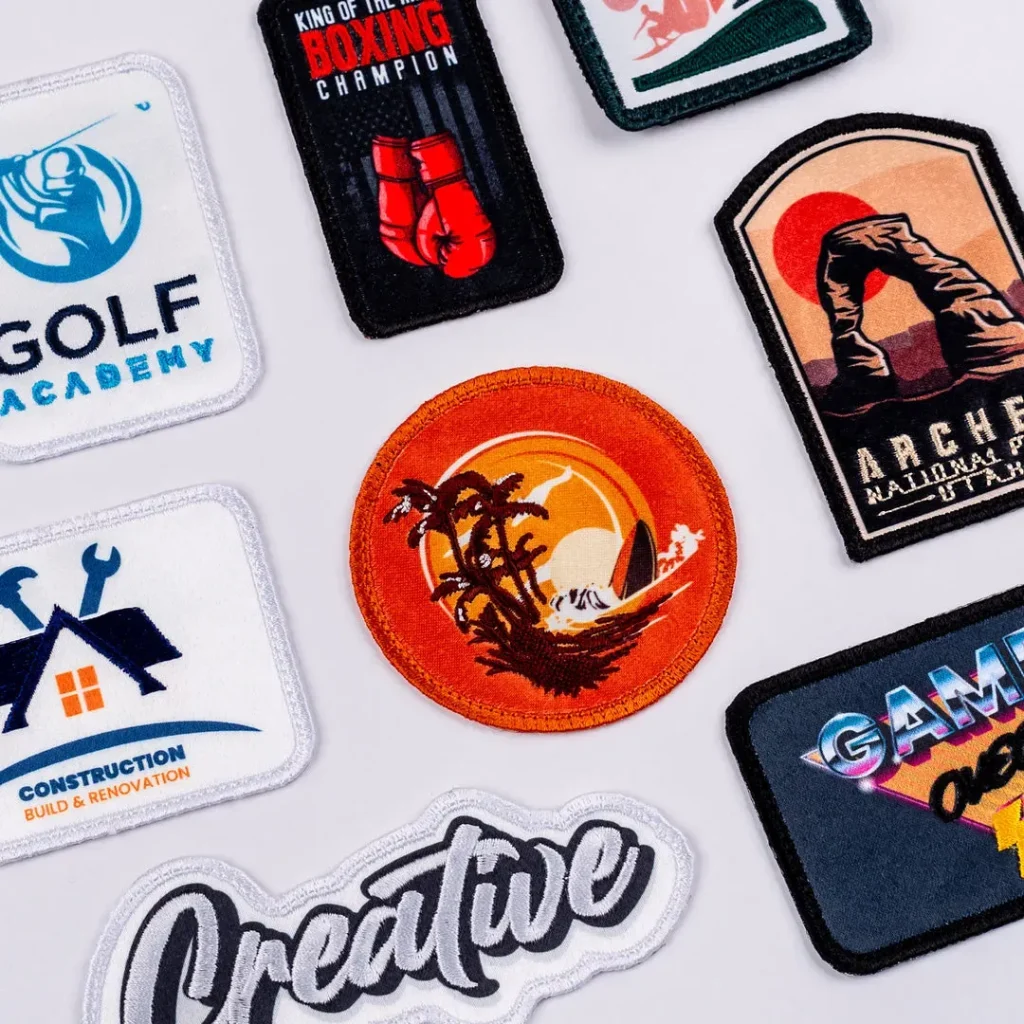
Designing Custom Patches is more than artwork on fabric—it’s a careful blend of creativity and production practicality. Whether you’re creating patches for a sports team, a fashion label, a community club, or a personal brand, the journey from idea to finished stitched product benefits from a clear plan and a robust custom patch design process, including stages for sketching, digitization, and stakeholder approval. This guide provides a step-by-step roadmap from concept to stitch patches to production-ready embroidery, helping you translate ideas into embroidery-ready files and select materials that wear well. It also highlights how to design patches with an eye for color direction, stitch economy, and durability, while detailing the patch design steps and offering guidance from an embroidered patches design guide. By keeping scope clear and collaborating with manufacturers, you ensure patches that look compelling, wear comfortably, stay faithful to your brand across different fabrics, communicate your message consistently, and deliver on time with predictable costs.
Beyond the initial concept, teams explore patch customization by considering placement, audience, and the best embroidery techniques to reproduce detail on different fabrics. The workflow shifts from rough sketches to clean vector art and clear specifications, echoing terms like patch embroidery design and production workflow to guide the journey from idea to wearable emblem. Designers scrutinize stitch choices, thread colors, backing options, and edge finishes to balance aesthetics with durability across jackets, hats, and bags. LSI-friendly terms such as badge creation, symbol-to-stitch planning, and material selection help ensure content remains relevant to readers and understood by printers and manufacturers. Documented specs, prototypes, and quality checks close the loop, enabling scalable production and consistent results across batches.
1) Designing Custom Patches: From Concept to Stitch
Designing Custom Patches is not just graphic art on fabric; it’s a structured blend of creativity and production practicality. The process starts with a clear purpose and a well-defined scope, ensuring the idea translates into embroidery-ready files and manufacturable patches. By framing the concept early—determining where the patch will be worn, how large it should be, and what backing will support it—you set the stage for a smooth transition from idea to stitch.
This approach aligns with the concept to stitch mindset central to the custom patch design process. It frames questions about materials, color limits, and production method, guiding you toward patches that look great, wear well, and stay within budget. When you adopt this mindset, you’ll find it easier to communicate with manufacturers and to produce patches that faithfully represent your concept to stitch from the initial sketch to the finished product.
2) The Patch Design Steps: A Practical Walkthrough
A practical guide begins with Step 1: define purpose, size, shape, and backing. Clarity at this stage keeps the patch design steps focused and reduces wasted iterations. By choosing a shape that fits the intended garment and a backing that suits the application, you prepare a solid foundation for every subsequent design decision.
As you move through the patch design steps, you gather inspiration, set a color direction, create concepts, and digitize artwork. This sequence—from concept to stitch—helps ensure readability at various sizes and keeps essential details intact when embroidered. The goal is to converge on a manufacturable concept that communicates the intended message without overcomplicating the stitch plan.
3) Color Strategy and Thread Simulation for Vibrant Patches
Color is a defining feature of patches. A deliberate color direction, aligned with brand or team colors, helps maintain recognition from a distance. Establishing a Pantone-mapped palette and planning thread simulation early reduces revisions later and ensures the final embroidery matches the intended mood.
Finalizing the color strategy involves testing thread counts, stitch length, and the balance between solid fills and line work. Modern design software lets you preview stitch density and detect potential issues before stitching begins. This attention to color accuracy and stitch economy directly affects production cost, durability, and visual impact in the final embroidered patches design guide.
4) Materials, Backing, and Fabric Choices for Durability
Choosing the right fabric base and backing is crucial for durability and attachment. Options like twill, felt, or other substrates influence backside support, edge finish, and how the patch adheres to garments. The backing option—iron-on, sew-on, Velcro, or no backing for pin-back—also determines how easy it will be for end users to apply and for manufacturers to produce.
Material selection shapes both tactile quality and wear performance. A well-considered embroidered patches design guide covers the interaction between fabric, thread, and backing, ensuring that the final product remains vibrant after washing and daily use. By integrating material strategy into the early design steps, you align aesthetics with practicality for long-lasting patches.
5) Prototyping, Revisions, and Production Planning: From Idea to Reality
Before full-scale production, prototyping is essential. Request a physical sample or dye-lot run to verify color accuracy, edge crispness, and overall balance. Use this stage to collect stakeholder feedback and refine density, stitch types, or color ranges. Prototyping acts as your safety net, catching issues before large quantities are produced.
With a validated prototype, you move into production planning and cost considerations. Define minimum order quantities, lead times, size variants, and packaging. Clear documentation—backed by a detailed spec sheet—minimizes miscommunication with the factory and helps you achieve consistent results across batches. This phase ties together the concept to stitch steps into a reliable manufacturing workflow and demonstrates how to design patches at scale.
6) Quality Control, Pitfalls, and Best Practices in Patch Manufacturing
Quality control ensures each patch meets standards for color variance, edge integrity, stitching density, and backing attachment strength. Providing end-user care instructions also helps preserve appearance and performance over time. Establishing QA checks at multiple stages reduces returns and keeps the final product aligned with customer expectations.
Common pitfalls include overly complex details that don’t translate well to small patches, color shifts due to lighting or fabric texture, and misaligned backing expectations. Adopting best practices—documented file structures, clear vector art, precise stitch counts, and finish details—helps you avoid these issues. Following an embroidered patches design guide throughout the process supports consistent, high-quality results.
Frequently Asked Questions
What is Designing Custom Patches and how does the custom patch design process begin?
Designing Custom Patches is the art of turning an idea into a stitched patch. In the custom patch design process, start by defining purpose, size, shape, and backing, then map constraints for production. This upfront planning ensures the concept translates cleanly to stitch and reduces revisions during production.
What are the patch design steps in the Designing Custom Patches workflow?
The patch design steps typically follow a clear sequence: define purpose and backing, gather inspiration, create concepts, digitize for embroidery, simulate color, prototype, and plan production. Each step keeps feasibility in mind and supports a smooth transition from idea to embroidery-ready files.
How do you move from concept to stitch patches in the Designing Custom Patches approach?
You start with ideation and rough sketches to test layout, then digitize into stitch paths, specifying stitch types, underlay, and density. The transition from concept to stitch is critical to maintain legibility and manufacturability, and test stitches help verify edge neatness.
How to design patches: guidance from the embroidered patches design guide within Designing Custom Patches?
In this framework, how to design patches centers on clean vector art, scalable layout, and clear typography suitable for embroidery. Follow the embroidered patches design guide: simplify details, map colors to thread brands or Pantone, and ensure the artwork remains legible at expected sizes.
Which materials and backing should be chosen during the patch design steps of Designing Custom Patches?
Choose fabric bases (twill, felt) and backing (iron-on, sew-on, Velcro) early in the patch design steps so density, edge finish, and attachment method align with production. Material choices influence backside support and wear, so finalize them before prototyping.
How does color strategy fit into the embroidered patches design guide for Designing Custom Patches?
Color strategy should be finalized with a Pantone-accurate palette and thread simulation, balancing solid fills and line work. The embroidered patches design guide emphasizes color accuracy, stitch economy, and legibility from a distance to maintain brand integrity.
| Section | Key Points |
|---|---|
| Introduction | Presents patch design as a blend of creativity and production practicality; emphasizes a clear plan and a full cycle from concept to stitch; aims to translate ideas into embroidery-ready files and to collaborate with manufacturers for durable, great-looking patches. |
| Step 1 | Define purpose, size, shape, and backing; decide placement, constraints, fabric compatibility, color limits, and production method to guide stitch count and density. |
| Step 2 | Gather inspiration and set a color direction; create mood boards, map colors to Pantone/brand systems, and plan color accuracy to minimize revisions. |
| Step 3 | Create concepts and rough sketches to test layout, typography, symbols, and composition; ensure readability at multiple scales and manufacturability. |
| Step 4 | Digitize artwork into embroidery-friendly formats; choose stitch types, underlay, edges, and zones; run test stitches for edge neatness and coverage. |
| Step 5 | Finalize color palette and simulate thread appearance; plan stitch density, balance solid fills and lines, and ensure legibility and durability. |
| Step 6 | Prototype and revise; obtain dye-lot samples, gather feedback, adjust density or color ranges, and select fabric base and backing for durability and attachment. |
| Step 7 | Plan production and costs; determine minimums, lead times, size variants, and packaging; identify cost drivers and document specs to prevent miscommunication. |
| Step 8 | Quality control and application guidance; set checks for color, edge integrity, backing strength, and provide care instructions to protect longevity. |
| Common pitfalls and best practices | – Avoid overly complex detail that won’t translate to small patches; simplify symbols and typography for legibility. – Plan for thread color shifts due to lighting and fabric texture; use color matches with fallbacks. – Test stability under load; account for stress and washing. – Specify backing and attachment method early to prevent returns. – Maintain organized files with clear specifications (vector art, color codes, stitch counts, finish details). |
| Conclusion (from base content) | A concise recap of the process, emphasizing how a structured approach—from defining purpose and constraints through prototyping and production—yields patches that are visually appealing, durable, and manufacturable. |