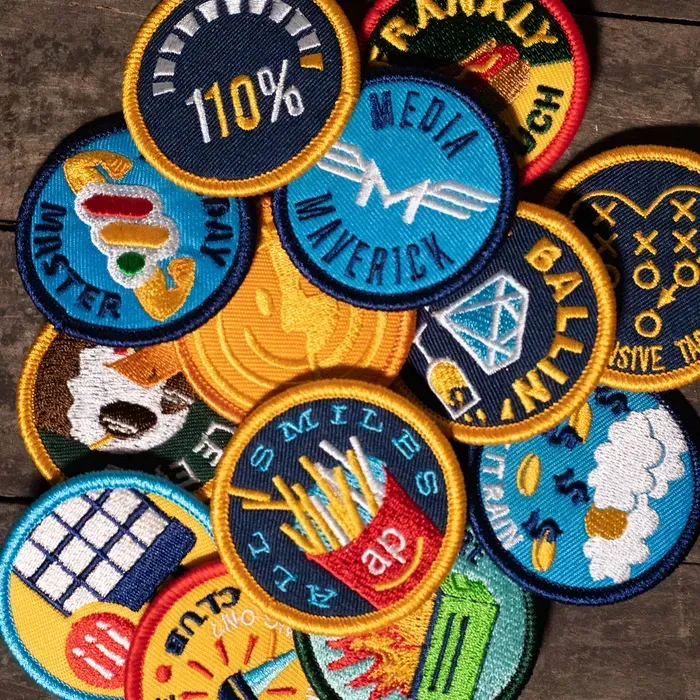
Custom patches have exploded from niche craft projects into mainstream fashion and branding. A strong start is the custom patches design that captures your identity and message. When you’re ready to move forward, you can order custom patches from trusted vendors. For fast styling, iron-on patches shine, while sew-on patches offer lasting durability. To maximize impact, apply patch design tips to shape, color, and backing choices.
Beyond the term custom patches, designers often call them fabric emblems, branding badges, or embroidered insignias. These small but expressive adornments update apparel and gear—from jackets and backpacks to caps and team uniforms—while reinforcing a visual identity. In an SEO-leaning approach, using related phrases such as badge design, emblem artwork, and backing options helps capture related searches without keyword stuffing. Whether you describe them as patches, emblems, or insignias, the core ideas of clarity, contrast, and durability remain the same.
Understanding Custom Patches Design: From Concept to Brand Clarity
Effective custom patches design begins with a clear concept that communicates identity, audience intent, and the story you want your patch to tell. Defining the core message early helps guide every subsequent choice—shape, color, typography, and border style—so the final patch feels cohesive with your brand. This approach aligns with patch design tips that emphasize legibility and recognizability at different sizes and on diverse fabrics.
A well-conceived concept scales from a small patch on a cap to a bold emblem on a jacket or bag. When you articulate the purpose—club ethos, corporate branding, or personal flair—you’ll choose symbols, colors, and text that reinforce that narrative. In practice, this means planning for a strong silhouette, a restrained color palette, and concise wording that stays legible when reduced for tagging or product labeling.
Backing Options and Application: Iron-On Patches vs Sew-On Patches
Backing choice is a foundational decision in patch design, affecting ease of use, durability, and care. Iron-on patches rely on heat-activated adhesive to bond the patch to fabric, making them ideal for quick style updates on garments that tolerate heat. This option is popular for personalizing denim jackets or canvas bags, but it requires careful heat control to protect delicate fabrics.
Sew-on patches provide lasting durability without relying on heat, making them suitable for workwear, uniforms, and items that go through frequent washing. They’re often preferred for professional settings and heavy fabrics, and they tolerate more aggressive laundering. If you’re balancing convenience and permanence, testing both backing types on a small batch can reveal which method delivers the best blend of application ease, durability, and appearance—an important step when you’re ready to order custom patches.
Sizing, Shapes, and Visual Impact: The Patch Design Tips That Matter
Size and shape determine readability and impact. A strong silhouette—think circle, shield, or bold die-cut—translates quickly across materials, while maintaining distinct identity on sleeves, bags, or caps. Patch design tips suggest keeping text minimal and ensuring high-contrast color schemes so details remain legible from a distance.
Edge finishing and embroidery density influence the final look and durability. A tight merrow border offers a classic frame, while a laser-cut edge delivers a modern, minimalist vibe. Test color contrast on multiple backgrounds to ensure the threads pop against common fabrics like black, navy, or gray, and consider increasing patch size for intricate logos to preserve fine details.
Materials, Colors, and Quality: Building Durable, Vibrant Patches
Material choice—thread quality, backing materials, and fabric type—directly impacts durability and washability. Denser embroidery on dark fabrics often requires brighter thread colors to maintain legibility, and choosing appropriate stitch types (satin, fill, or running stitches) adds texture and depth to the design. Attention to colorfastness helps ensure your patches stay vibrant through campaigns, merchandise drops, or team wear.
Quality control and production planning are essential for consistency across batches. When you plan orders of patches for merchandise, uniforms, or events, specify backing type, thread palette, and fabric compatibility early. Coordinating these choices supports a uniform appearance across thousands of patches and helps maintain brand integrity from concept to finished product.
The Ordering Path: From Artwork to Finished Patch
Turning a design into a physical patch begins with production-ready artwork. Prepare vector art (AI, EPS, or SVG) for clean scaling, and confirm final patch size and backing. This step is crucial for crisp lines and accurate color reproduction, and it aligns with the need to deliver a precise, high-quality result when you order custom patches.
A streamlined ordering process includes proofs, lead times, and minimum order quantities. Request a digital or physical proof to verify color accuracy and stitch density, and clarify production timelines to align with launches or events. Clear communication with the vendor, plus an understanding of MOQ and turnaround, makes the journey from artwork to finished patch smooth and predictable.
Wearing, Caring, and Inspiring Patch-Driven Style
Patches extend beyond decoration, serving as branding elements for teams, clubs, and corporate gifts. Whether you apply iron-on patches for quick updates or sew-on patches for long-term wear, the goal is a cohesive, stylish result that travels with the wearer. Grouping patches thoughtfully—pairing bold, high-contrast designs with subtler companions—creates a narrative across jackets, bags, or hats.
Care and maintenance ensure patches keep their look over time. For iron-on patches, adhere to recommended heat settings and test on a small area first; inside-out washing can help protect the patch’s edge and adhesive. Repair or reseal backing as needed after washing, and store items properly to preserve color and texture for future wear, brand campaigns, or new product drops.
Frequently Asked Questions
What are the essential steps in custom patches design to capture a clear concept?
Start with your core message and audience, then decide shape, color palette, text, and edging. Following patch design tips helps ensure legibility on smaller applications and keeps branding consistent across caps, bags, and jackets. Use the phrase custom patches design as a guiding frame to translate concepts into stitch-ready art.
Should I choose iron-on patches or sew-on patches for my project, and what are the trade-offs?
Iron-on patches offer quick styling with heat-activated adhesive, ideal for fabrics that tolerate heat. Sew-on patches provide lasting durability on heavier fabrics and are less sensitive to washing. Choose based on fabric, permanence needs, and maintenance.
How large should custom patches be for different applications like caps, jackets, or bags?
Aim for 1-3 inches for hats and wristbands, and 3-4 inches for jackets or backpacks. Consider readability, fabric texture, and embroidery density; adjust size using patch design tips to preserve detail at smaller scales.
What do I need to provide to order custom patches to ensure accurate production?
Provide vector art (AI, EPS, or SVG) for clean scaling, specify final size and backing, and request a proof before production. Also confirm lead times and minimum order quantities to plan your order custom patches confidently.
What backing options are available for custom patches design, and how do I choose the best fit?
Backing options include iron-on, sew-on, magnets, and Velcro. Iron-on is quick for lightweight fabrics; sew-on is durable on heavy materials; magnets or Velcro are for temporary or interchangeable designs. Your choice should match fabric, wear, and care, and testing different backings is a smart patch design tip.
How should I care for and wear patches to maximize longevity and impact?
Follow the recommended heat settings for iron-on patches to avoid damage, and turn garments inside out during washing. Re-seal the backing if needed and layer patches thoughtfully to build a narrative without overpowering the item, whether you use iron-on patches or sew-on patches.
| Topic | Key Points |
|---|---|
| Introduction |
|
| Designing Custom Patches |
|
| Choosing Materials and Backings |
|
| Sizing, Shapes, and Visual Impact |
|
| Materials, Colors, and Quality |
|
| The Ordering Process |
|
| Wearing and Caring for Your Patches |
|
| DIY vs Professional Production |
|
| Use Cases and Inspiration |
|
Summary
Custom patches are a versatile, durable way to tell a story, reinforce a brand, or celebrate an achievement. This descriptive overview highlights how thoughtful design, material choices, and a smart ordering process bring patches from concept to finished fabric accents. Whether you’re patching jackets, bags, or uniforms, custom patches offer a durable, expressive form of identity that can elevate teams, events, and merchandise.