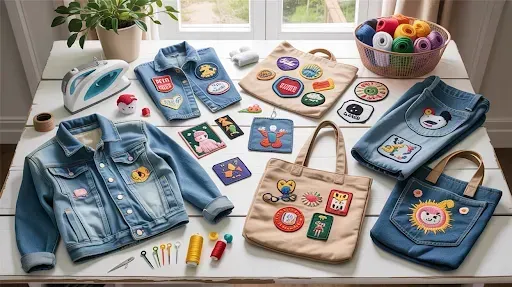
DIY patch projects turn worn garments into artful statements, transforming old fabric into something new and wearable. With simple techniques like sew patches on clothes or iron-on patches, you can repair damage while adding personal style. This approach supports patch repair clothing and upcycling clothes with patches, turning frayed areas into design moments with thoughtful color and texture. It also invites patch ideas for fabrics that balance durability with style, guiding you from planning layouts to stitching securely. By the end, you’ll have a wearable piece that speaks to sustainability, budget-friendly fashion, and your personal creativity.
Beyond the practical repair angle, this craft fits into garment mending as a form of textile embellishment and creative patchwork. Think of it as clothing customization and sustainable fashion, where decorative patches transform wear and revitalize wardrobes. From sew-on appliqués and embroidered accents to iron-on designs, the concept embraces fabric collage and upcycled materials for unique results. Approach the project with intention—plan placement, balance textures, and choose patches that read as intentional detail rather than improvisation. By framing repair as design, you gain a flexible approach to patchwork that celebrates durability, color, and personal storytelling.
DIY patch projects: turning wear into wearable art
Every worn garment is a canvas awaiting a new story. DIY patch projects blend sustainability with personal style by transforming holes, stains, and faded areas into deliberate design choices. Upcycling clothes with patches lets you breathe new life into denim, knits, and canvas while cutting waste, and it invites experimentation with patch ideas for fabrics—from bold graphic rounds to subtle shapes that echo the garment’s lines.
Before you start, plan your layout and fabric compatibility. If you sew patches on clothes, choose patches that match the fabric weight and the repair area. Heavier patches perform well on denim or canvas, while lighter patches suit knits. If you’re in a hurry, iron-on patches can provide a fast refresh, and you can reinforce their durability with a simple zigzag or running stitch to ensure the patch repair clothing lasts wash after wash.
Mastering sew patches on clothes: techniques for durable repairs
To master sewing patches on clothes, start with the basics: a sharp needle, matching thread, and a stable surface. Select stitches that suit the patch type—backstitch for security, running stitch for a slim finish, or a decorative blanket stitch on felted fabrics—to create durable repairs that blend with the garment.
Align the patch carefully, using pins or light baste to prevent shifting. Finish the edges with a secure stitch and press from the reverse side to minimize puckering, so the result looks intentional rather than improvised as a patch repair clothing project.
Iron-on patches: quick style boosts with lasting grip
Iron-on patches offer a fast route to refreshed style, especially for beginners. Check fabric compatibility, lay the patch in position, cover with a pressing cloth, and apply heat at the manufacturer’s recommended setting for 30-60 seconds without sliding, ensuring a clean, secure bond.
Let the patch cool completely before testing the bond. For added durability, consider sewing around the edges after ironing to reinforce the adhesive and prevent edge lifting over time; this keeps the result durable and neat even after repeated washes.
Choosing patch materials: weight, fabric compatibility, and patch ideas for fabrics
Patch styles vary in durability and texture: woven patches, embroidered patches, and iron-on patches each have a place depending on the garment. Match the patch weight to the fabric—heavier patches for denim or jackets, lighter options for knits—and consider how embellishment will interact with wear and washing.
Also consider backing, adhesives, and stabilizers to protect delicate fabrics. For long-lasting results, combine iron-on patches with a little sewing edge, and plan topstitching to reduce curling and maintain a clean silhouette across the patch ideas for fabrics.
Designing patch layouts: color, shape, and upcycling strategy
Plan color palettes that guide patch placement, or choose contrasting hues for bold accents. Think in shapes that complement the garment’s lines—rounds to soften rugged areas or geometric patches to add a modern edge—and consider layering patches as a small patchwork collage. This upcycling clothes with patches approach lets you tell a story through color, texture, and placement.
Here are practical ideas: place knee patches on jeans for reinforcement and style, add elbow patches to a jacket for character, or multiply small patches along a pocket edge to create a playful detail. These patch ideas for fabrics work across denim, canvas, and knit fabrics, enabling sustainable fashion.
Maintenance and care for patched garments: prolonging life and sustainability
After-care is essential to extend the life of patchwork pieces. Turn garments inside out, wash on a gentle cycle, and air-dry when possible to protect both the fabric and the patch. Regular care helps ensure that patch repair clothing remains durable and looking intentional rather than worn out.
Regular inspection helps you catch lift or curling early. Re-stitch edges or reseal patches as needed after several washes, and consider reapplying patches when necessary to keep the garment looking designed rather than improvised.
Frequently Asked Questions
How can I get started with DIY patch projects to repair jeans using sew patches on clothes?
Getting started with DIY patch projects on jeans using sew patches on clothes is straightforward. Choose patches that match the fabric weight (woven or embroidered for denim), layout the design, wash and dry the garment, then pin or baste the patch in place. Sew around the edges with a tight running stitch or a backstitch, optionally add a second outer row for durability, and press from the reverse to set the patch. This approach keeps repairs sturdy and the result looking intentional.
What’s the difference between iron-on patches and sew patches on clothes, and how do I apply them safely?
Iron-on patches are fast and beginner-friendly, but you should compare them to sew patches on clothes. Check fabric compatibility (cotton, denim, sturdy synthetics), use a pressing cloth, and test on a scrap area before applying. Align the patch, cover it with cloth, then heat with an iron for 30–60 seconds without sliding; let cool and reheat if needed. For extra durability, consider stitching around the edges after ironing.
Which patches are best for patch repair clothing on a jacket or backpack, and what supplies are needed?
For patch repair clothing on a jacket, backpack, or similar item, gather patches types (woven, embroidered, iron-on). Prepare the garment, cut patches to fit, and press or sew as appropriate. Stabilizers or interfacing help prevent puckering on delicate fabrics. Finish by pressing and inspecting; turn inside out for laundering and re-seal if needed.
How can I upcycle clothes with patches to create a cohesive look, and what patch ideas for fabrics work well?
Upcycling clothes with patches lets you reuse and reimagine garments. Start with a cohesive color palette and patch ideas for fabrics that complement the base item. Consider a denim jacket with a back panel collage, patch pockets, or a border along a hem for a designer-like touch. Layering patches of different shapes and textures creates a unique, handmade look.
What common mistakes happen in DIY patch projects and how can I avoid issues like misalignment or fabric puckering?
Common mistakes in DIY patch projects include misalignment, fabric puckering, and overheating patches. Prevent them by planning the layout on paper or with removable tape, using stabilizers on delicate fabrics, selecting the right needle, and testing heat on scrap fabric before applying to the garment.
What are some beginner-friendly patch projects or design tips for upcycling clothes with patches?
For beginner-friendly patch projects, try knee patches on jeans, patched pockets, or a back panel collage on a denim jacket. Keep patches smaller for easy management, mix woven and embroidered patches for texture, and finish with topstitching around the edge for durability. These quick projects demonstrate core skills in upcycling clothes with patches.
| Aspect | Key Points |
|---|---|
| Goals & Benefits |
|
| Patch Types |
|
| Tools & Materials |
|
| Sewing Patches (Process) |
|
| Iron-on Patches (Process) |
|
| Restoration & Design |
|
| Placement & Care |
|
| Common Mistakes |
|
| Creative Ideas |
|
| Care & Longevity |
|
Summary
DIY patch projects open a practical, stylish way to extend the life of your clothes while showcasing your personal taste. This approach blends repair and design, allowing you to mend holes, update fabrics, and express your style without buying new garments. By choosing patch types—woven, embroidered, or iron-on—and by planning placement, color, and texture, you can transform worn items into cohesive, wearable art. With careful technique, patience, and a dash of creativity, patches become durable features that reduce waste and refresh your wardrobe, stitch by stitch.